

The first step to achieving professional sound starts before you even step on location to record. Selecting the correct tools for success requires early attention to detail. Whether you are capturing environmental sounds, casual interviews, or interactive dialogue, each scenario could require a variety of audio equipment. In this blog we will focus on how we capture audio in a casual interview setting.
Choosing the Right Location


Getting involved in pre-production can enhance your experience as a location sound recordist. Identifying the location early on can help you prepare for what challenges you might encounter once you arrive on location. Even if you do not have the power to choose the location, having a discussion with the producer can help prime the production team on what to expect. Is there a loud train that rips right by the location every half hour? Are there noisy pets in neighboring buildings? Do loud refrigerators or generators hum incessantly throughout the room? Is the space just a plain room with blank walls or is it filled with sound absorbing furniture and decor? These are all things to discuss when considering an interview location!
Treating the Room


When the Director and Director of Photography have worked together to find the frame, your next step is to treat the room as best you can while staying out of frame and not causing safety hazards. When it comes to interviewing in people’s homes or spaces you do not have complete control over, it can be tough to minimize all sound reflections and room noise. The goal is to treat the biggest pain points and let some things be. Depending on the space or tone of the project, some natural reverb or room noise can add character. Sound blankets (or furnie pads/moving blankets) can be your best friend on run-and-gun sets. Placing these in key areas around your subject can help dampen sound reflections. These could be safely placed under the interview subject to dampen tile floors or draped over stands to dampen sound bouncing back off the walls around the room. Don’t forget about ceiling reflections as well! If you have the time and means, placing dampening material above the subject can really clean things up even further. Additionally, be hyper aware of noises from fans, refrigerators, lights, and other items around the home. Always ask to see if certain appliances can be unplugged to help silence the room.
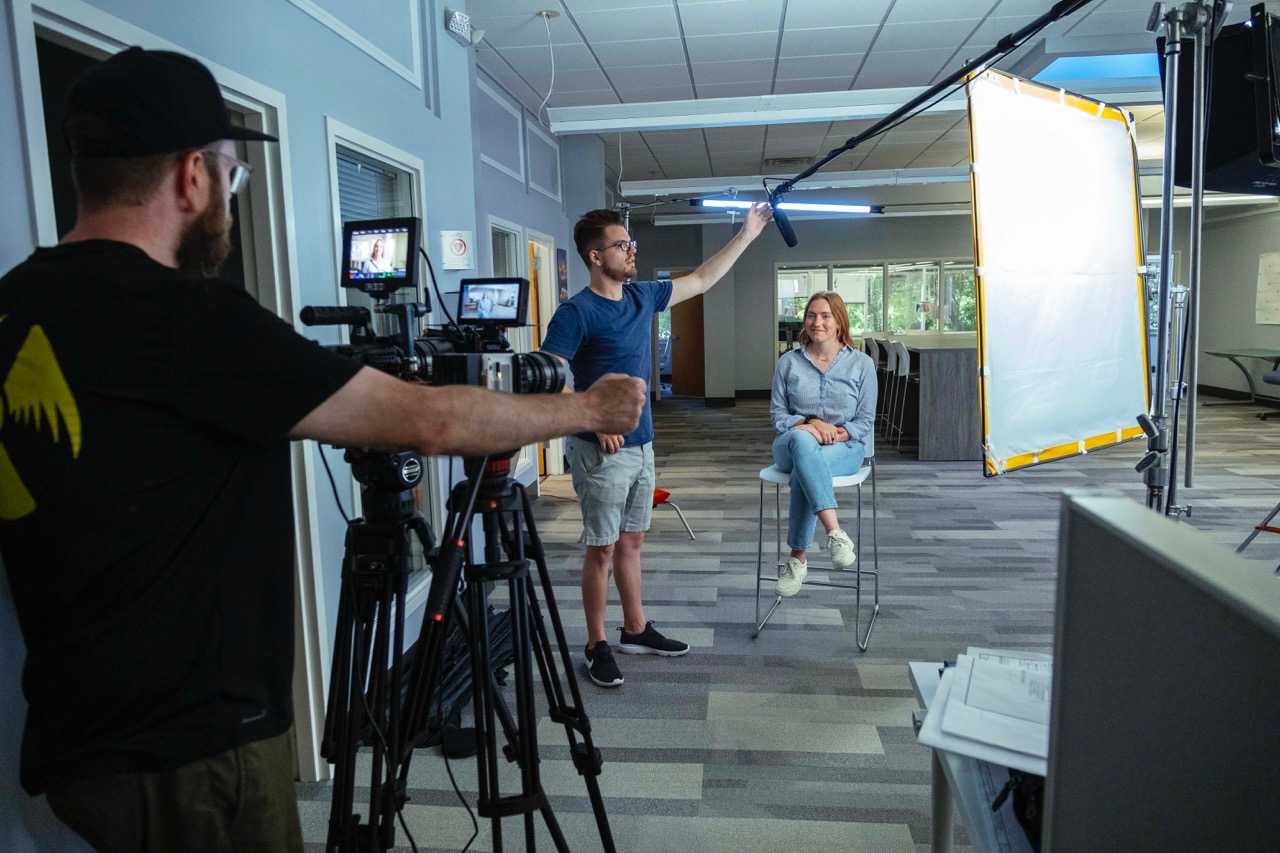
Placing the Microphone(s)


It is important to know that you only need to treat the area of the room where you will be placing your microphone. Keeping the mic choice and placement in mind can help pair down some room treatment decisions. In a typical interview, we reach for our Sennheiser G4 wireless lav mic kit in tandem with booming a Rode NTG shotgun mic. The key to getting clean dialogue is getting your microphone as close to the subject as possible while still sounding natural and not interfering with the frame. Lav mics are a great choice for this because you can easily hide it under your subject’s clothing. If you are unsure of where to place a lav mic under clothing, it might be safe to just leave it clipped with the capsule exposed. Be sure to talk with your director to see if it is appropriate to have an exposed lav mic. The boom mic serves as a redundancy or safety for when something could go wrong with the lav mic. Sometimes there is too much mic noise from the lav being so close to clothing or from wireless interference during a very pivotal moment in the interview. Having a boom in place is always a great safeguard and can be a better option in certain settings.
Recording and Monitoring Audio


Once everything is in place, the sound recordist’s job has only just begun! After you gain stage the inputs on your field recorder, it is critical to continually monitor the signal. We run sound with the Zoom F4 and it can record and monitor up to 6 channels of audio at once. It’s at this point that you should be listening for any issues such as lav mic clothing noise, wireless interference, boom signal clarity, or any other potential noises going on in the room. Should any issues arise, be respectful when letting the director and talent know you need to make a few adjustments. While interrupting an interview is not ideal, letting a problem persist throughout the entire recording will only hurt you in post-production!
Some say sound is 50% of the viewer’s experience so be sure to give it the attention it deserves! Capturing clean audio at the source is the best way to guarantee the most flexibility in post-production. We don’t have time in this blog to cover the post sound process, but we will close this out by sharing an example of a short documentary project we did last year for Lotus Recovery Centers in Boone County, which serves as a good example of us applying the above principles.